NOTE: all the images in these documentation articles can be enlarged by clicking on them, allowing you to see more detail that is not visible at the small size. Clicking on an enlarged image will close it out of the way again. Figure 1 is an example of an image that would need to be enlarged to read all the text notes it contains.
The image in Figure 1 shows the layout of the main screen components in ShowSim. The central area of the screen is your sky canvas, which is where the simulation will take place. Normally the Cue List would fill this space when working on shows, and various tools and utility windows will also float above the display area while you work. The Effect Browser panel on the left and the Time Line panel along the top will automatically hide themselves during certain operations where they are not needed in order to make the display area completely visible. These panels can also be toggled on and off using the buttons in the show settings area of the main button bar at the bottom.
Window Management
There are two basic modes that control how the various floating windows are displayed: Detached and Fixed. In Detached mode, which is the default mode, each window can be independently sized and moved to create the layout that works best for you. If Detached Mode is turned off in the settings menu seen in Figure 3, then the windows will automatically tile themselves according to available space. Because the title bar and frame are removed from each window while in this mode, it can free up a little space and is suitable for working on small screens such as laptops. Figure 2 shows what the screen looks like with detached mode turned off, while figure 4 shows how the windows can be resized when detached mode is turned on.
In the upper right corner of each window is a thumbtack button that is used to control the visible state of the window during simulation playback. When the button is depressed, then the window will not hide itself duration a simulation, otherwise it will hide itself when a simulation starts and then reappear only after the simulation ends or is stopped by the user. Figure 5 shows a typical simulation playback configuration where the effect browser and script editor windows are set to hide themselves while the time line windows remains visible.
Multiple Monitors
ShowSim’s user interface fully supports use of multiple monitors in order to maximize the amount of data visible at one time. Using two monitors allows you to dedicate one screen to showing the just the simulation window, while the script, inventory and effect browser can be setup on the other monitor as seen in Figure 6. This is the optimal configuration because it allows the script window to remain visible during simulation playback, where you can then see the highlight bar moving down the script list as a secondary method of seeing which cues are currently bursting (or firing, depending on how you have it setup). Some users have even stretched the Time Line to span across both monitors, giving a very wide view of the cue layout relative to the music. Even laptops can be configured to use two monitors with the use of USB video port adapters, so this method is highly recommended for the best workflow and highest degree of customization.
Main Button Bar
Most functionality in ShowSim can be accessed via the button bar at the bottom of the screen. The bottom tool bar is divided into six functional groups: 1) playback controls, 2) data controls 3) program settings, 4) show settings, 5) output options and 6) sound control. The show settings buttons will only appear when a show has been loaded from the Show Manager. The Time Line also has its own button bar that is used to control the display of the music waveform, along with a second set of playback controls that operate just the same as those on the bottom button bar.
Player Controls
The simulator control bar at the bottom left corner of the screen is used to start, stop and pause the play position of your shows. This same set of buttons are also displayed at the top of the screen above the Time Line.
 |
Rewind Player |
Stops the currently playing show and rewinds play position back to the
beginning.
|
 |
Stop Player |
Stops the currently playing show, or any other long running effect test such as
a cake or gerb.
|
 |
Pause Player |
Pauses the currently playing show and freezes the current simulation graphics
into a still frame. The Play button must be used to resume from a Pause.
|
 |
Start Player |
Starts playing the simulation from the current play position.
|
 |
Create Video |
This button is used to access the video recording mode, where your show can be converted to an .avi video file for the ultimate playback quality. |
Data Controls
The data control buttons on the tool bar are always visible and handle all operations having to do with inventory, show, effect and video data. The table below shows the icon for each button and what it does.
 |
Inventory Browser |
This button will open the Inventory Browser, which is where all inventory items are managed. The Inventory Browser is also used in conjunction with the Script Editor when scripting a show from inventory. |
 |
New Show |
This button is used to start a new show from scratch. It has the same function as the New button in the Show Manager. |
 |
Show Manager |
The show manager is where you will access all your shows. Information about each show can be quickly accessed, and show data can be imported, exported, deleted or cloned from this screen as well. |
 |
Import/Export |
This button brings up a menu where all the data import and export options are found. The backup and Restore options are also accessed from this menu, as well as the mortar rack inventory editor. |
Page 1
|
|


Figure 1:
Screen layout and function locations (click to enlarge).
Figure 1:
Screen layout and function locations (click to enlarge).
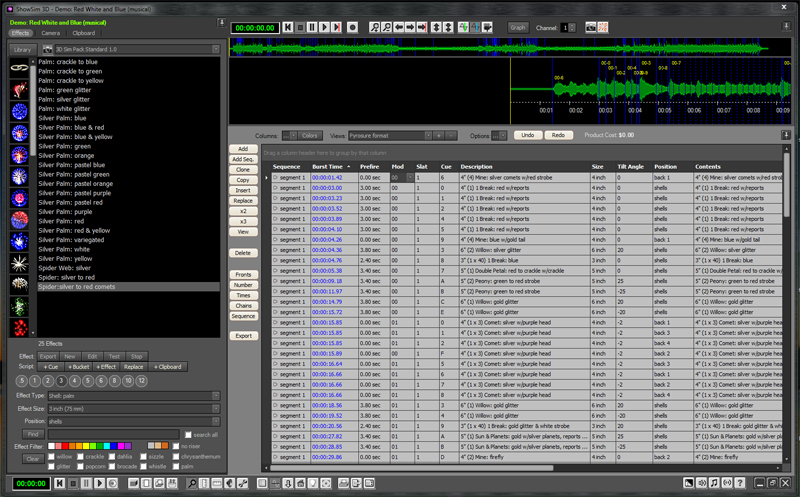
Figure 2:
Floating panels fused together when "Detached Mode" is disabled.
Figure 2:
Floating panels fused together when "Detached Mode" is disabled.
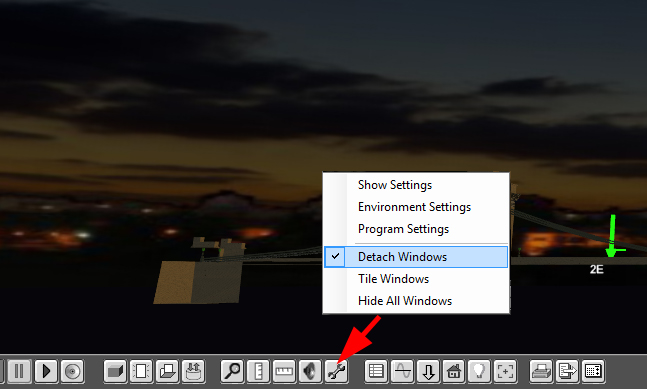
Figure 3:
Selecting detached mode from the settings menu.
Figure 3:
Selecting detached mode from the settings menu.
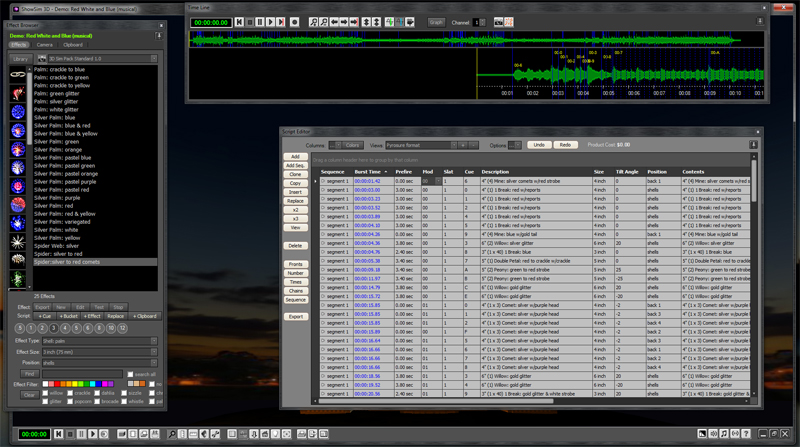
Figure 4:
When in detached mode, windows can be independently sized and positioned.
Figure 4:
When in detached mode, windows can be independently sized and positioned.
Figure 5:
Effect Browser and Script Editor windows hide themselves during playback.
Figure 5:
Effect Browser and Script Editor windows hide themselves during playback.

Figure 6:
Using a second monitor to display the simulation window while working windows are set to remain visible during playback.
Figure 6:
Using a second monitor to display the simulation window while working windows are set to remain visible during playback.
|
|